

Update: The original LZ1AQ preamp has since been replaced with the version made by Everett N4CY. The rotor is now an Alliance HD73
This is the antenna I was planning on building when I ordered the LZ1AQ amplifier (and then built the hula hoop antenna as a quick test of the amp).
There is some technical information on the antenna here, which I won’t repeat, but I’ll summarize the design:
The antenna is made of four square loops. These loops are connected to the LZ1AQ amplifier. So there are eight wires feeding the amplifier, with four pairs of shorted connections, so four wires in total attached to the amp.

The amp is mounted inside of a plastic box, the type used as a junction box for runs of conduit.
The output of the amplifier is shielded ethernet cable, which runs to a control board in the shack. One pair is the signal from the amp, the other wires are used for power, as well as controlling the amp, as it can be switched remotely to use all or some of the loops. I still need to apply silicone sealant to the eight openings where the wires run in, and seal the ethernet cable entry hole with some tape.

I was debating between building a wood or PVC pipe frame. I went with the PVC because I did not want to deal with cutting and gluing the wood, or using nails and brackets and add additional nearby metal objects. I used 1″ PVC pipe.
I first cut the 10 ft PVC pipe pieces into 5 ft lengths and built the loop frame that size. I stood it up, and realized that no, this was not going to last long. So I cut the pipe down from 60″ sides to 40″ sides (close to one meter) and ended up with a much more mechanically stable design.
The wire that forms the loops is attached to the PVC pipe with plastic wire ties. the wire is white, so difficult to see in the photos. It is #10 stranded wire. Ideally you want to use as large a diameter conductor as possible, to reduce the inductance. But you quickly run into two issues: cost, and ease of use. Larger diameter cable was much more expensive. And it was going to be difficult to work with. Copper or aluminum tubing could be used, but they were also more expensive.
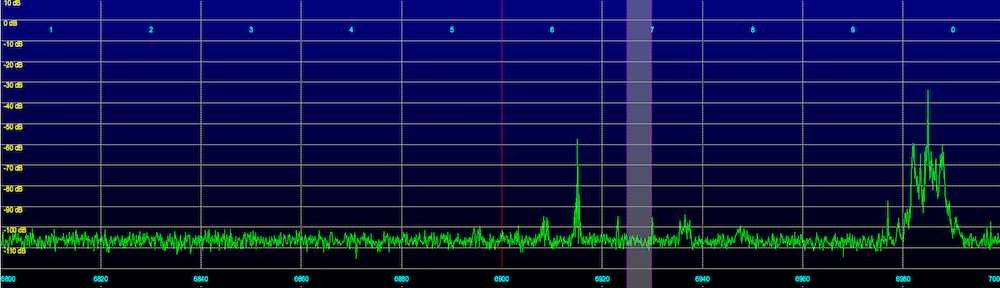
The loop is mounted on an old rotor (the one I used with my large resonant loop antenna project, which has been moved to a back burner for now). This antenna is indeed directional, at least on MW. I am able to hear a nearby pirate station on 1620 with it aimed in that direction, while an orthogonal bearing drops it down to just a weak carrier. Meanwhile, on my 670 ft sky loop antenna, I only have a very weak signal.
I’m quite impressed with the performance of the antenna so far. On HF, it does quite well, usually close to the big 670 ft sky loop (my main HF antenna) and sometimes better. Two places it always beats the sky loop are LW and the lower end of the MW band (where the sky loop is too short) and 11 meters (where the sky loop is way too large). It will take some more time to fully test it on a variety of signals.
Hmmmmmmmm, how about using the outer braid of trashed coax. Talk about cheap. I use that as a great cheap ground wire conductor for groundings. Might as well use that as an antenna as well.
Yes, that would work great.
Pingback: AirSpyHF+ vs netSDR Shootout | RadioHobbyist.org
I would love to see additional results using this antenna. I would be especially interested in VLF testing and also directionality at all frequencies. Thanks, Chris for all your projects!
Pingback: Another loop construction project - The RadioReference.com Forums